
I used stamps from Lavinia Stamps and Card-io Stamps for this project, which I did in my art journal, but also makes a great card topper of even a piece to be framed.
Products used.
Stamps used are all from Lavinia Stamps and are: Tree Den, Tree Stem, Toad Lodge, Honeysuckle Cottage, Orchard Grass, Field Grass and Vine.

Card-io Stamps used, Field Flare (flowers) Peaceful Place (mushrooms)

Lavinia Stamps Elements ink pads for the background.
Lime Punch, Confetti, Violet Chalk and Sundance.
Versafine/Clair for stamping, in Onyx Black and Shady Lane.
Your preferred form of colouring medium, I used Distress Marker.
For details, Posca Pens in white and pink.
Step 1
Splitting your page into 4, blend the inks in this order from the bottom, Lime Punch, Sundance, Confetti and Violet Chalk, fading it out slightly where the different inks will meet. Don't worry about perfect blending as it's going to be well covered with the stamping, and it also adds texture to the scene.

Step 2

Now the stamping begins.........
Using Tree Den, stamp it twice towards the sides of your project.
Step 2

With the same stamps make a mask by stamping onto copy paper and cutting it out. Make sure you cut just a tiny bit into the image, this just means when you place it over the stamped image, you'll see the edge of the stamped image so when you stamp beside it, going over the mask, the stamping lines up and you don't get any of the background showing beside the images. You'll see what I mean when you do it....
You'll also need a mask for the Tree Stem and Toad Lodge stamps.
Step 3

Place the mask over one of the Tree Den images, making sure it's nicely lined up, take the next stamp, Tree Stem, and stamp one image either side of the previous image. Once you remove the mask, you'll see this stamping now looks like it's behind the first image. Do the same with the other tree, this time only stamping the Tree Stem once. Sorry I should've had a photo for this part, I forgot.
I use a bit of washing tape to keep my mask in place as it's removed easily leaving no sticky residue. Some people also use sticky notes. Do whichever you prefer.
Step 4

Stamp Toad Lodge towards the bottom on your project.
Step 5

Place the masks for Toad Lodge and Tree Stem over the images and stamp Honeysuckle Cottage as shown below.

Now it looks like Honeysuckle Cottage is slightly in the background.
Step 6

For the moon/sun you'll need a circle cut from paper or acetate, anything really. Place your Tree Den mask towards the top of the stamped image and place the circle mask over that.
Take Violet Chalk ink and blend lightly around the circle mask, this creates the moon/sun behind the trees.

Step 7

Now to stamp the foliage. Using the Vine stamp and Shady Lane ink, stamp randomly across the top of the trees.

Using the grass, flowers and mushroom stamps, add more images till you're happy. Remember to use your masks too, so some of the foliage is coming from behind the trees and houses.
Step 8

Colour your images with your choice of colouring medium, pencils, inks, makers, whatever you prefer.
And lastly add the finer details with your white and pink Posca pens. You can also use gel pens is you want, again it's just whatever you prefer or already have.
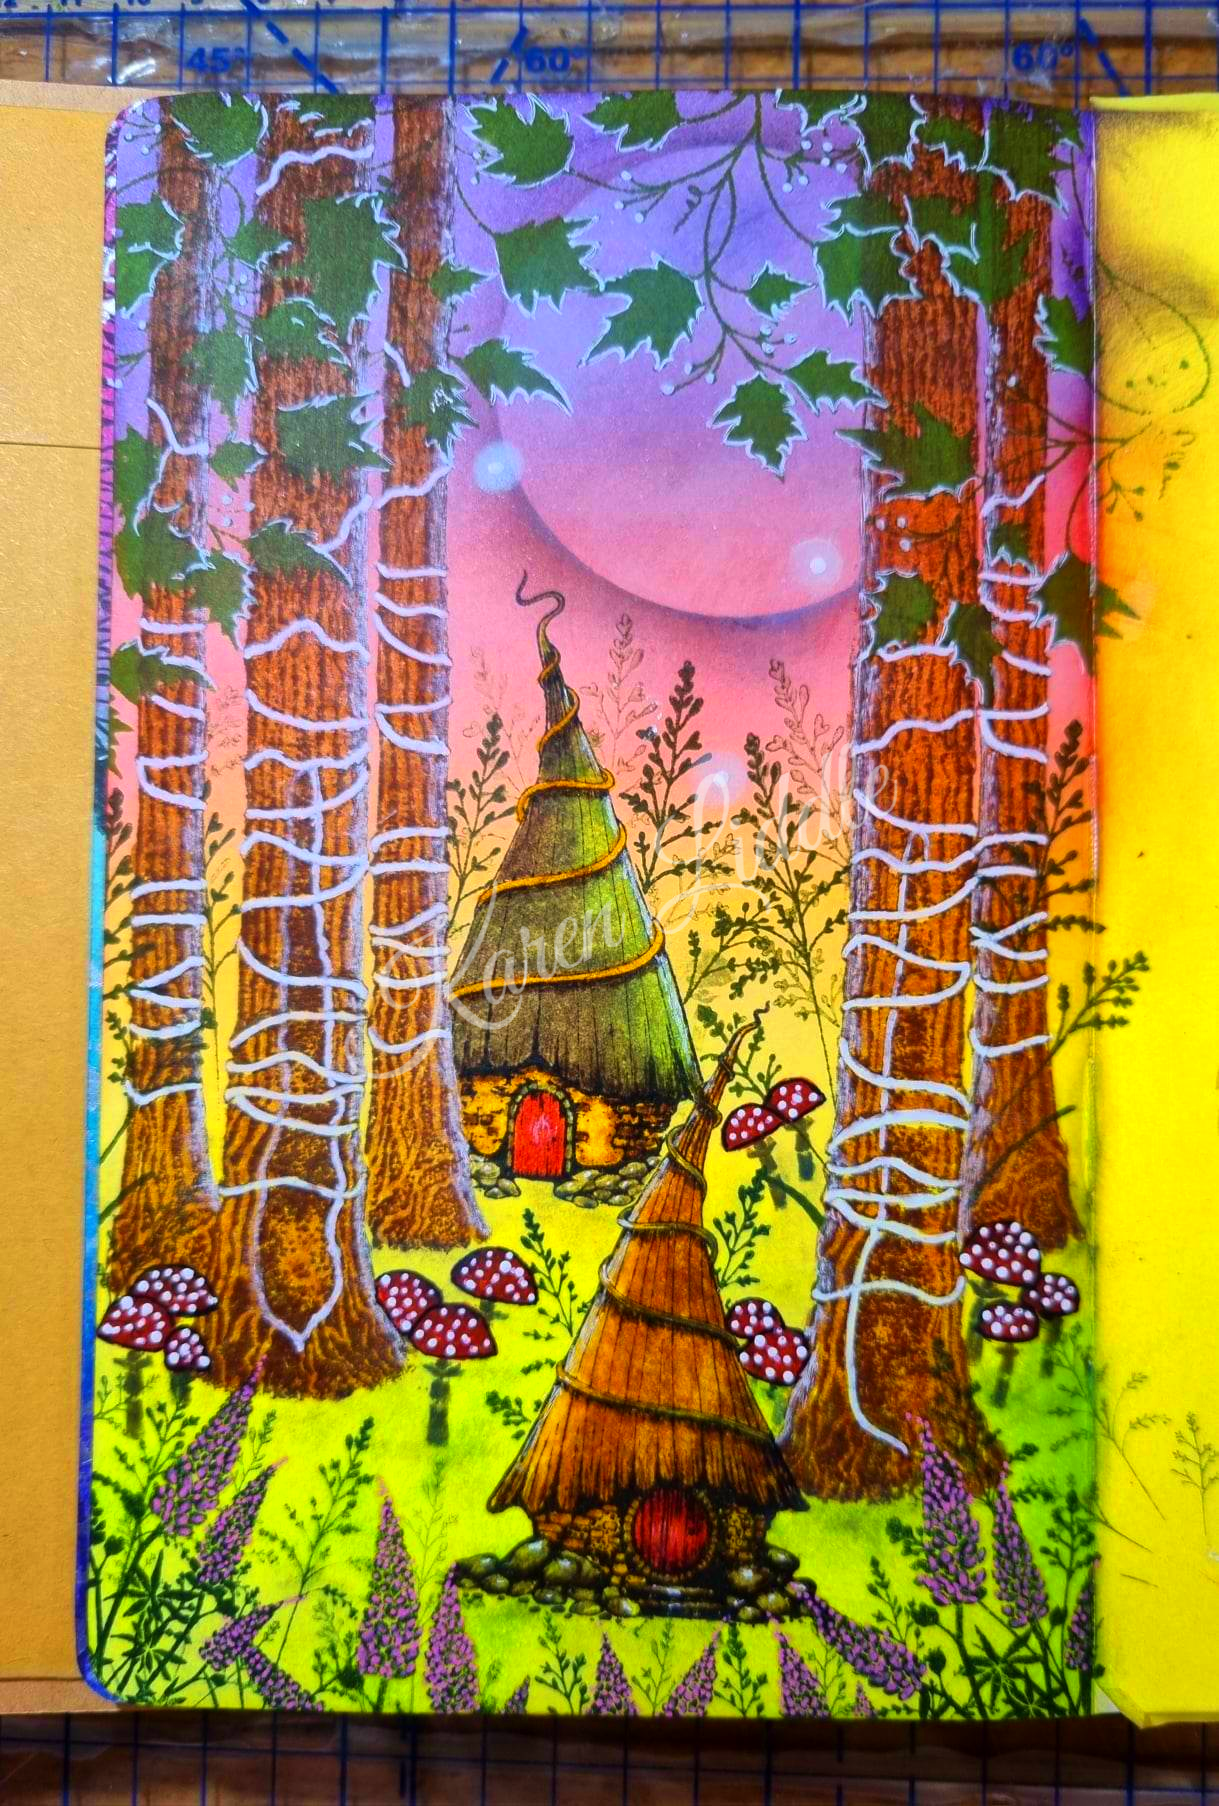
I used the pink Posca for the flowers at the front, and the white for the details on the leaves, trees, mushroom and houses.
Along the edges of the trees and houses, add applied the white, then smudged it a little with my finger, just to give a softer look, like the moon shining on them.
For the little orbs, I applied some white PanPastel through a small circle stencil and added a dot in the centre with the white Posca.
And you're done!
Hope you enjoyed my step by step, it's the first one I've done for a long long time and thanks for looking.