My Lovely Followers

Tuesday 29 March 2016

Poppies

I was raking through one of my boxes of stamps the other day and came across this one, never used and still sealed, shocking I know...... lol, but how many of us have done the exact same thing.  The stamps are by Sheena Douglass and the set is called Poppies & Daisies.  I stamped in Versafine onto Sheena Stamping card, then used Distress ink to colour the image - Seedless Preserve, and Adirondack - Oregano.  Finally all mounted up onto a gate fold card, with an embossed base.
Thanks for looking.
xx

Saturday 26 March 2016

Best Wishes.......

I made the background with Aquatints brushed onto water colour card, I love this effect.  Then I stamped the flowers with a Sheena Douglass stamp from the Floral Fiesta set, I stamped in Versafine.  Then I used the faux bleaching technique to lift the colour from the flowers.  All you do is apply water with your paint brush and plain water, dabbing with a piece of kitchen roll till you're happy with the effect.  Then I splashed the water over the whole piece which left white spots, again it removes the inks.  This works with any water based ink.  The sentiment is from a Stamps U Love set.
Thanks for looking.
xx

Friday 25 March 2016

Forever Yours by Sheena

I love this stamp, but it took me 3 times to colour and be happy with the end result...... lol.
I tried colouring this image with Distress Inks, but couldn't get a result I was happy with.  So I dusted off my ProMarkers, they've been very neglected for quite a long time now as I very rarely colour an image anymore.  Anyway, they came up trumps, as always..... lol.   For the background I spritzed a piece of cardstock with water, then scrunched it all up until I was happy with all the wrinkles and creases.  Once it was dry, I spritzed the cardstock with various ink sprays, sorry I don't have the colours but they're a mix of Cosmic Shimmers and Dylusions.  Once I had the effect I wanted I dried it off with the heat gun then spritzed again, but with just plain water with a bit of mica powder added, to give it a pearly sheen.  Once it was all dry, I ironed it as flat as possible. The flowers are cut with Sheena's dies  from the Day Of The Dead collection, stamped over then with the matching stamps, then added some silver Gilding Wax (Pebeo)  The leaves were cut with a Sue Wilson die, then it was all mounted onto a canvass, which I have coated with black Gesso and rubbed some silver Gilding Wax over.
Thanks for looking.
xx

Monday 21 March 2016

Alcohol Inks and a bit of Sheena

I'm still playing with The Day Of The Dead stamps by Sheena Douglass.
I've used an alcohol ink background for this one.  Just dropping the ink onto the photo paper and blowing it around a bit with a spritzer.  I cut the skull out and heat embossed it in silver and attached it to the background with glue gel to give it some height, then stamped the corners using Stazon ink.
Thanks for looking.
xx

Sunday 20 March 2016

Day of the Dead Stamps by Sheena Douglass

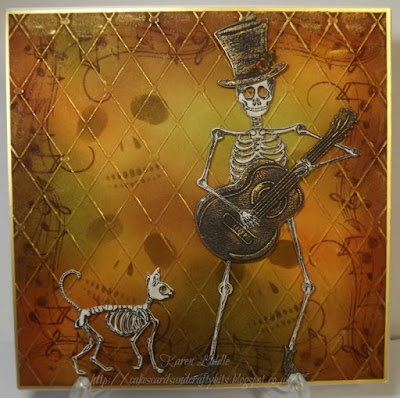
Another projects us these fab stamps.  This is for my sons 19th Birthday next week.  He plays the guitar so thought it was perfect.  It just needs the sentiment adding.
I started by inking the background with Distress Inks in Rusty Hinge and Vintage Photo and Adirondak Pesto.  Once that was done, I stamped around the edges with the music stamp, then I used the Skull die and just inked through it, to get the ghost like faces, then I ran it though an embossing folding and added some Gilding Wax when it was done.
Now for the toppers, they're all cut with the Dies from this set then stamped.  I cut the guitar and hat from black card, and coated with the 3 different colours of Gilding Wax, Silver, Empire Gold and Renaissance Gold.  These dies are brilliant as you can cut them and pose the skeleton however you want.  I just had to add the cat too.... lol.
Thanks for looking.
xx

Sugar Skulls

I think I've got a serious addiction to the new stamps by Sheena Douglass, Day of the Dead. When I first saw them, I honestly thought oh they're nice, but not my thing........ well the more I saw the work by Sheena's DT, the more I liked them, in the end I just couldn't resist and ordered the lot!  I've liked Sugar Skulls for a long time.
This is what I've been making over the last couple of days.
I cut and made this shadow box a few months ago using my cameo, but then changed my mind on what I was going to do with it.  So it's just been sat around looking very boring and sad as plain white cardstock. Well once these stamps and dies arrived, I knew just what to do with the shadow box.  I started by giving it a coat of black Gesso.  Then I made the back panels, coated them with Gesso too and when dry ran it though one of Sheena's embossing folders and gave them a covering of Gilding wax, then attached them to the box and left it to dry.
Next I started on the skulls, for these all the stamps are from the same collection and all are painted with Aquatints.  I then die cut the corners and coated them with the Gilding Wax, the box also got the same treatment.... lol.  I love the 3 colours of was together.  I attached the skull with gel glue so that they are raised, then added the corners.
Now I'm looking for space to hang it in my craft room..... 
Thanks for looking!
xx

Wednesday 16 March 2016

Spring Colours

I can post this card at last...... I made it a couple of weeks ago, but had to wait to upload it as the recipient will have seen it.....  Anyway, it was her birthday at the weekend, so here it is.  First I stamped the flowers with Versamark and heat embossed with white embossing powder.  Then I inked it up with Distress Inks in Broken Chine and Fossilized Amber (I think).  Once happy I then splashed some water over it and dabbed it of to reveal white spots, (the water removes the ink), I also added some script with a stamp by Tim Holtz.  Finished off with a computer generated sentiment and cut it with a Sue Wilson die.
Thanks for looking.
xx

Monday 14 March 2016

2 Layer Stamping

This stamp is by Hobby Art.  I stamped with VersaMark and heat embossed with white embossing powder, then coloured with Aquatints.  For the background I used Adirondack shade Pool.  The sentiment is from a stamp set from Stamps U Love.

Fairies from Lavinia

I've been playing with Aquatints, which is what I made the background with.  All the stamps are from Lavinia.  I used a Spectrum Noir sparkle pen over the top of the leaves.  Since I don't do much colouring now, I bought the pack of clear sparkle pens rather than the coloured sets.

Monday 7 March 2016

Lotus Blossoms

I really love these layering flower stamps.  These are  Lotus Blossoms from Stampin Up (not sure if they're still available as I bought them from a selling group on Facebook),
For this one I used one shade of Memento Ink for the flowers, Teal Zeal, though it does look more blue in the pic.  I stamped the first stamp (darkest), straight from the stamp, for the second step I  inked up the stamp and stamped first onto scrap paper then stamped over the first image, for the 3rd layer I inked up and stamped twice onto scrap paper then stamped over the other 2 image.  The stems were stamped with Memento Cottage Ivy.  The mason jar is from a stamp set by Inkadinkadoo and stmped in Memento London Fog.  I pierced round the edge to finish off.
For this one, I stamped the first stamp straight from the pad using Memento Love Letter, then for the 2nd stage, inked up the stamp and stamped onto scrap paper first, then stamped over the first image.  The white layer was created by stamping the 3rd stamp with Versamark and then heat embossed with clear embossing powder.  The background was done with Distress Inks, blended, in Broken China and Mowed Lawn.  The clear embossing powder acts as a resist, so any ink just wipes of that part of the image. I then splashed water over it and dabbed off leaving white speckles.  Finished off with a bit of the Bokeh technique.  I got the inspiration for this one from Google.
Thanks for looking.
xx

Lavinia Stamps

The challenges have just started up again at Lavinia Stamps, but this time it's through Facebook instead of their challenge blog.
The coloured cardstock was a piece of waste which I used to smooch through Distress Inks in the colours, Picked Raspberry, Spiced Marmalade and Mustard Seed.  I simply pressed the ink pads onto my craft mat, gave them a spritz of water, then pressed the piece of card into it.  I like the end result, so kept it for future use.  All I did was stamp the flowers in black, the bubbles in Picked Raspberry, added some sparkle then cut the piece into 3 equal sized pieces. 
Thanks for looking.
xx

Wednesday 2 March 2016

Poppies in the Spotlight!

I don't think I've ever done this technique before, so thought I'd give it a go.
I started by stamping the poppies, a stamp from Inkylicious, I stamped first in the middle of the card stock, then stamped again at either side to lengthen the image.  I stamped the image again and cut a circle from it and coloured the poppies with promarkers.  I mounted this onto a piece of coloured card stock and attached it over the same part of the card.  The sentiment is from a stamp set by Stamps U Love.
Thanks for looking.
xx

Wonderful Day

I made this background a few weeks ago and it's been sitting looking at me since then, screaming for me to add it to a card.... lol
I started by inking a piece of card stock with Distress Inks in Peacock Feathers, Picked Raspberry and Mowed Lawn, then I ran it through the Bigshot to emboss it.  Next I carefully swept over the embossing with a Versamark ink pad, then heat embossed it using clear embossing powder, added my favourite sentiment stamp by Inkylicious, using one of the Pierced Flag dies by Sue Wilson and finished off with a few sequins.
Thanks for looking.
xx