My Lovely Followers

Showing posts with label Inkylicious. Show all posts

Sunday, 25 October 2020

Winter Wishes


 I love this simple technique which I saw on Inkylicious's site a couple of years ago.  White ink blended through a stencil with a blending brush, well I use shaving brushes.....lol.  The stamp is by Inkylicious and simply highted with a white gel pen.

Thursday, 13 April 2017

Flowers from Inkylicious

I made both of these cards a couple of weeks ago, but kept forgetting to take a photo..... lol.
 The flower stamp and the sentiment are both from Inkylicious.  The flower was coloured with Zigs.  The card background are Adirondacks blended with the blending tool.
The same flower stamps, again coloured with Zigs.  I used Brushos on water colour card for the background.  The sentiment is from a set by Altenew.  The black borders were cut with a punch by EK Success.

Tuesday, 25 October 2016

More Christmas Cards.......

I've been doing well with making my Christmas cards the last couple of weeks, here's this weeks makes.
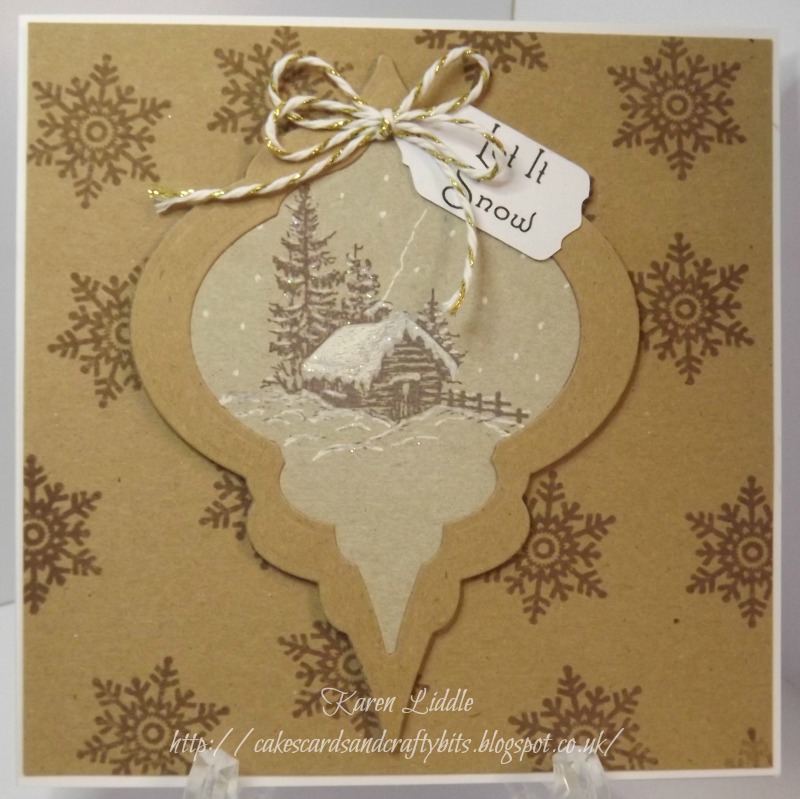
 Well I'm still not too sure about Kraft Card or not...... hmm.  I started off by cutting the shape with a die by Spellbinders,  first I cut the full shape, then used 2 together to make a frame.  Taking the full die cut, I blended white ink with a shaving brush, till I was happy with the depth of white.  I then stamped the image with Memento Rich Cocoa, stamps from Inkylicious, and used a white gel pen to create the snow, which I then gave a bit of sparkle to with Glamour Dust, lastly I attached the frame cut and added the sentiment, which I made on my Cameo, and the twine bow.  For the backing I simply stamped random snowflakes with the same colour memento ink.
 This is my latest stamp from Penny Black, I do love there twiggy/tree stamps.  I  started this card by cutting a frame using the Sue Wilson Noble Pierced dies.  I then stamped the image and heat embossed in white.  Then I used Distress Inks in Stormy Sky and Chipped Sapphire and blended it with sponges and added the berries with Waco Pearl Maker (saves on gems..... lol).  While the pearls dried I stamped the border using my Misti to line them up near as perfect as I could.... lol.  The border stamps are by Phill Martin, and I love them!  Once all dry I put the card together sticking the image piece straight onto the card, then place the frame using sticky pads to lift it just a little.
 I made the frame the same as the card above.  For the centre, I stamped and heat embossed the snowflakes using clear embossing powder.  Snowflake stamps are by Sue Wilson, then blended Distress Inks in Shaded Lilac and Tumbled Glass over them, the clear embossing powder acts as a resist so the white from the card show through.  Then I splashed a little water over the inks to create the little white spots.  The card was then finished off the same as above.
 I embossed the background first, then cut the frame using a die by Amy Design called Wintertide.  I also cut a circle of card big enough to sit behind the frame.  I stamped the trees in Versamark and heat embossed with clear powder, so I could ink over the image without it smudging. The tree stamp if from Inkylicious, I used shaving brushed to blend the 2 colours of Distress Ink, Tumbled Glass and Spun Sugar.  I finished the card off with a sentiment made on my Cameo and some Christmas twine.
Again the frame was created the same way as the others.  I masked off the image piece and blended Broken China Distress Ink.  Then using the masks again where needed I stamped the trees and added some sparkle for the snow, again using Glamour Dust.  The tree stamp is from a Penny Black,The card was finished of the same as above.

Thursday, 20 October 2016

Inspiration from Pinterest

I'm on a roll with my Christmas cards, though I'm a long way behind what I usually am every year.
 I made a stencil with a bauble die for this one.  I blended ink with brushes through the stencil, then stamped my image and coloured it with pencils, stamp is by Inkylicious,  I then used the same dies to cut a frame which I attached over the image,  to give the impression of it being a bauble, and gave it a bit of sparkle, it's showing very gold in the photo, but it isn't really.... lol.  The sentiment is one I made last year on my Cameo.  To finish off, I added card candy to each corner and give that the sparkle treatment too....lol

Both of these cards use the Winter Berries stamp from Penny Black which I stamped with Rich Cocoa Memento ink.  Stormy Sky Distress ink was blended over that.  The sentiment on the first one is from a stamp set by Penny Black, and the other Visible Image.  I used Pinflair Pearl Wand for the red berries.

Tuesday, 12 July 2016

40th Birthday

The present challenge on That's Crafty (22.7.16) is Feminine.
It's my nieces 40th on Friday, so I thought I'd make her card a little different.
I repeatedly stamped the water droplets to cover my piece of card stock, this stamp is from Inkylicious.  Then I used Distress Markers to add the colour.  I then went back to each one and removed some colour from the bottom of the droplet, just with a paint brush and water, then added the white dots on each with a gel pen.  This give them so much dimension.  Next I blended some Distress Inks onto a piece of white card and cut them out with a die, added a little bit of stamping before adding them to the card.  I printed the sentiment and cut it out with tag dies by Sue Wilson.
I think the water droplets look like gems or misshapen jelly beans..... lol.
Thanks for looking.

Sunday, 10 July 2016

Water Droplets

 I got inspiration from Eileen Godwin for this card.  The background was made with Distress Inks, pressing the ink pad onto an acrylic block, spraying with water, then placing onto a piece of card.  Once it was dry I stamped the water droplet stamp.  I removed a little of the colour from each droplet using a paint brush and water and dabbing of the water.  Once dried I added little white spots to the top of the droplets, to give more dimension.  I die cut the butterflies on a piece of leftover over card, and attached them with foam pads.  The sentiment is from a stamp set by Stamps U Love.
I used the same stamp for this one, but stamped onto white card and coloured each droplet with Distress Ink Markers.  I think they look like jelly beans or jewels.
The droplet stamp is from Inkylicious or Designs by Ryn.

Saturday, 4 June 2016

Seahorses

The present challenge over on That's Crafty is 'The Sea'.  This is my entry for the challenge.
I cut the tag from Sheena's stamping card and gave it a spray with Dylusions inks. I used a stamp from a Sheena Douglass set for the leaves, the bubbles are an Inkylicious stamp,  The seahorses was the free stamp on the latest issue of Craft Stamper, and she shells are from an older copy of the same mag, both coloured with Distress Inks.
Thanks for looking.
xx

Wednesday, 25 May 2016

Inspiration from...................

.................  Hermine Koster.  I've been following Hermine for quite a while now and her work is just amazing and I think she such an inspiration.  I thought it was about time I tried putting some of her inspiration into action.
I began by stamping the butterfly, then stamping it again on a sticky note to make a mask.  Once I had the mask in position, I started to do some random stamping using Distress Inks in Milled Lavender and Dusty Concord, I also used a stencil.  Once I was happy I removed the mask and coloured the butterfly using just Dusty Concord, finishing off with the text.  Stamps used are a mixture from Inkylicious, Stampers Anonymous and Kanban.
Thanks for looking.
xx

Monday, 23 May 2016

Country View Challenges

I made this project for the present challenge over on Country View Challenges where the theme is 'Stencils'.

I started the background by sprinkling  some brushos onto my work surface which I spritzed with water, then simple 'dipped' the card into it a few times till I was happy with it.  Once dry I randomly stamped some text and swirls with stamps by Tim Holtz.  To finish of the background I inked through a sunray stencil with distress ink.  I stamped and embossed the butterfly on a scrap of water colour card, then used Brushos to add the colour.  I finished off with a few gems and a bit of rough heat embossing round the edges.  The Butterfly and sentiment stamps are from Inkylicious.  
I have a fear of Butterflies or moths, and it's not very often I use them in my crafting, but I do have about 4 Butterfly stamps that I love. At one time I never used them in crafting, but the stamps are making me use them more, but I'll still never like them in RL.... lol.
Thanks for looking.
xx

Sunday, 22 May 2016

More Brushos

All of these cards follow the same technique, I've just used different stamps.  I sprinkled a small amount of the Brusho powder in just one spot, then spritzed it with water then used my TH Spritzer to blow some of the colour around, before letting it dry.  Once dry I added the next colour and carried on till I'd used all the colours.
 Stamps from Lavinia Stamps, coloured with Brushos.  The colours I used are Purple, Cobalt Blue, Gamboge, Leaf Green and Rose Red.
 Stamps from Inkylicious, the butterfly is also coloured with Brushos.  The colours used are Sea Green, Orange, Rose Red, Cobalt Blue and Gamboge.
Stamps again from Inkylicious, colours used are Purple, Lime Green, Gamboge, Vermillion and Turquoise.
Thanks for looking xx

Brushos

I made the background with 3 colours of Brushos, Purple, Emerald Green and Yellow.  I let each colour dry before adding the next as I didn't want the colours mixing.  The Fairy is from a set by Chocolate Baroque and the grasses from Inkylicious all stamped with Versafine and heat embossed with black powder.  The sentiment if from a set that was free with a magazine a long time ago.
Thanks for looking.
xx

Monday, 9 May 2016

Same Stamp, 3 Cards

I didn't realise how long it was since I last blogged, so sorry but I've had the decorator in again and my house has now been decorated from top to bottom and I've finally got my pictures back up!  I'm on painting my old kitchen cabinet now, one of those from the 1950's.  I bought it about 25 years ago and it's been all colours..... lol.  Now it's going to be black and white to match my kitchen even though it doesn't actually stand in my kitchen, but it's very close.... lol.
I bought some new flower stamps from Honey Doo Crafts, this is one of the stamps, went a bit mad using it for the first time..... lol.
 I used Spectrum Noir Blending Pencils to colour this one.  I used the 'Sue Wilson Pricking Technique' round the edges, the sentiment stamp if from a set by Stamps U Love.  Sorry I forgot to make a note of the colours used.
 I used just one shade of Distress Ink to colour this one, Seedless Preserve, and also used the same colour for the splatters.  The sentiment is a stamp by Inkylicious, still my favourite sentiment.
I used Distress Ink to colour this one too, Peacock Feathers and again for the splatters, and my favourite sentiment stamp again.

Saturday, 9 April 2016

Butterfly Tag

I blend 2 Distress Inks, Twisted Citroen and Fossilised Amber.  I used the water droplet stamp from Inkylicious and stamped them first lightly with Fossiblised Amber, then again with Versafine Smokey Grey.  I then heat embossed the butterflies from Sheena Douglass and coloured them with the same Distress Inks.  I used a white gel pen to add the white spots to the water droplets and finsihed off with 2 sentiment stamps from the same butterfly set.
Thanks for looking.
xx

Wednesday, 2 March 2016

Poppies in the Spotlight!

I don't think I've ever done this technique before, so thought I'd give it a go.
I started by stamping the poppies, a stamp from Inkylicious, I stamped first in the middle of the card stock, then stamped again at either side to lengthen the image.  I stamped the image again and cut a circle from it and coloured the poppies with promarkers.  I mounted this onto a piece of coloured card stock and attached it over the same part of the card.  The sentiment is from a stamp set by Stamps U Love.
Thanks for looking.
xx

Wonderful Day

I made this background a few weeks ago and it's been sitting looking at me since then, screaming for me to add it to a card.... lol
I started by inking a piece of card stock with Distress Inks in Peacock Feathers, Picked Raspberry and Mowed Lawn, then I ran it through the Bigshot to emboss it.  Next I carefully swept over the embossing with a Versamark ink pad, then heat embossed it using clear embossing powder, added my favourite sentiment stamp by Inkylicious, using one of the Pierced Flag dies by Sue Wilson and finished off with a few sequins.
Thanks for looking.
xx

Wednesday, 24 February 2016

Altenew & Water Colouring

I made this card a few weeks ago, but never got round to uploading it, due to other things getting in the way...... lol  I used the outline stamp from the Beautiful Day stamp set and used water colours to colour them.  The sentiment is a stamp from Inkylicious, my favourite at the moment.
Thanks for looking.
xx

Tuesday, 2 February 2016

Have a Wonderful Day!

I've been playing with water colour paints and stamps from Altenew.  The stamps are from the Peony Bouquet set.  I stamped onto water colour card with VersaMark and heat embossed with white embossing powder.  I used Gansai Tambi water colours in the following shades - Pale Aqua, Blue, Evergreen, Mid Green and a light brushing of Silver over all the petals.  I finished off with a sentiment stamp I love, from Inkylicious.

Wednesday, 27 January 2016

Happy Birthday to my Daughter!

Today is my Daughter, Becky's 24th birthday, oh it doesn't seem 5 minutes since I had her........
I got my Pan Pastels out for this one, the first time I've actually used them for a card, I've only messed around with them, think I been a bit scared of them...... I don't know why, because they're easier to use than inks!.....lol.  First I used the negative of the moon mask, and sponged on some of the yellow Pastel, then I swapped over and used the positive of the mask and added the rest of the colours, blending them in to each other.  I then removed the mask and blended some pink over it to 'soften' the sun.  Before stamping, I set the Pastels with some cheap hairspray.  Once it had dried I started with the stamping.  I used a mix of stamps from Inkylicious - cat, butterflies and grasses, Lavinia - the stars, and the tree bough is a Stampscape stamp, I added a sprinkling of glitter to the stars to give it that magical feel.  The text border was done on the computer.
Pan Pastel colours I used are -Bright Yell. Green Tint, Bright Yell. Green Shade, Orange Tint, Magenta Tint, Magenta Shade and Phthalo Blue Tint.
Thanks for looking.
xx

Saturday, 2 January 2016

No one likes to make Sympathy cards.......

My sister in law lost her father in law earlier today, so I felt the need to make a couple of cards.  He was a lovely man, who along with his wife, always made us feel welcome whenever we visited my sister in law.  We have daughters the same age, so we saw a lot of her in laws when they were young. So here's the cards, one for my sister in law and one for her mother in law.
For the background panel, I applied 2 shades of Adirondack inks - Stonewashed and Cloudy Blue to an acylic block, spritzed with water and stamped it onto my cardstock. Then stamped image with Majestic Blue, Versafine and heat embossed with clear embossing powder.  This stamp is from Lavinia Stamps and the sentiment is by Personal Impressions.


The background panel on this one was made by blending Seedless Preserve Distress ink to the cardstock with a duster brush.  I then stamped the image, stamp from Inkylicious, in Versamark Imprerial Purple, and heat embosed with clear embossing powder.  I used the same ink to ink up a scrap of card which I also heat embossed with clear embossing powder, then cut out the sentiment with a die.
I think sympathy cards should be 'clean' looking and simple, but that's just me..
Thanks for looking.
xxx

Messed up turns good

Well this almost went into the bin!
This was another background I'd made months ago.  My friend KathyK showed me this technique, Faux Mother of Pearl, last year at the Craft Bubble Craftathon, thanks Kathy.  So as I mentioned in an earlier post, I'm working my way through backgrounds I've made.  I stamped with Distress Inks and Adirondacks in various colours, but I made a booboo when I stamped the largest stamp, the colour turned out far too dark, it looked as if it was black and was far to 'hard' looking.  Then I had a brainwave..... lol, got out my Misti and re positioned the stamp exactly over the images I didn't like, and stamped with Versamark, then heat embossed with white embossing powder.  Misti is just great for doing this. 
All the stamping was done with one set of stamps by Inadinkado, Cirlcles & Dots.   I added the sentiment, a stamp from Inkylicious, to finish off.  Not bad for a card that was destined for the bin is it...... lol
I've added a tutorial for Faux Mother of Pearl on the 'Tutorials from around the Web' tab at the top of the page.